
Success with 3D Foam
3D foam embroidery is a popular technique for caps, streetwear, and premium branding, but getting it right can be tricky. If you’ve ever struggled with uneven finishes or visible foam, you’re not alone.
Hard Vs. Soft Foam: While both serve the same purpose, the key difference lies in the final embroidery result. As a general rule, hard foam is best suited for structured items like baseball caps, jackets, and heavier fabrics where a more defined effect is needed. On the other hand, soft foam is recommended for use on garments such as sweatshirts, hoodies, and t-shirts, where a subtler finish works best.
In this guide, we’ll answer some of the most common questions about 3D foam embroidery and share practical tips to help you achieve consistent, high-quality results every time.
What is 3D foam embroidery?
3D foam embroidery is a technique in which a layer of foam is placed beneath the embroidery. As the machine stitches over the foam, the thread compresses and shapes it, creating a raised effect that gives the design a three-dimensional appearance.
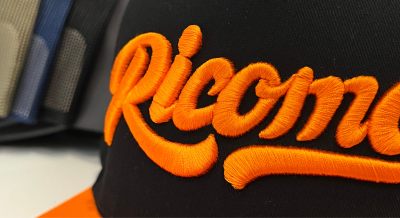
This technique is particularly effective for logos, lettering, and graphic elements that benefit from strong visual impact. Caps are one of the most common applications, as the structured surface and bold designs lend themselves perfectly to the elevated look that foam provides.
Why Stitch Density Matters
One of the most important adjustments when working with foam is stitch density. The density used for standard embroidery is typically around 0.4 mm, but when foam is introduced, the stitching needs to be much closer together and reduced to approximately 0.2mm.
Reducing the stitch spacing allows the thread to fully cover the foam beneath it, ensuring that the foam remains hidden once the embroidery is complete.
A higher density also helps perforate the foam more effectively. As the needle repeatedly penetrates the foam, it weakens the surrounding material so that the excess can be easily removed after stitching.
If the stitch density is too low, the foam may remain visible between stitches or along the edges of the design. This can result in a rough or unfinished appearance, which is why adjusting density is one of the first steps toward achieving a smooth, professional finish.
Adjusting Pull Compensation for Foam
Because the needle is stitching over a layer of foam rather than directly onto fabric, the material naturally creates more resistance. As the thread tightens, this resistance can cause satin stitches to pull inward slightly, making columns or lettering appear narrower than intended.
Without proper pull compensation, letters may appear distorted or uneven, particularly in thicker satin columns. Taking the time to adjust this setting helps preserve the accuracy of the design and produces a cleaner overall result.
The Role of Capping Stitches
Capping stitches play an important role in finishing 3D foam embroidery designs neatly.
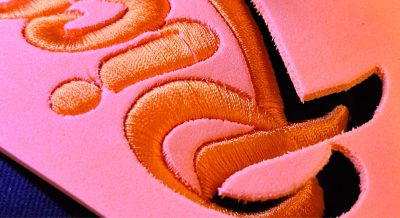
These stitches are placed at the ends of satin columns or lettering and act as a seal. Securing the edges in this way will prevent the foam from pushing through the thread or becoming visible along the borders of the design.
Including capping stitches during the digitising stage is therefore essential for achieving a clean, professional finish.
Do I Need a Special Needle?
A common misconception about 3D foam embroidery is that it requires specialised needles. The most important factor is selecting the correct needle type for the fabric you are embroidering rather than the foam itself.
For caps and structured materials, a sharp-point 80 titanium-coated needle (such as SAN® 1) is recommended, as it penetrates the material cleanly and handles the extra resistance created by foam. For knit fabrics such as hoodies or T-shirts, a 75/11 ball-point needle is a better choice to prevent fabric damage.
Matching the needle to the material ensures smoother stitching and helps avoid unnecessary thread breaks or fabric distortion.
Does Foam Colour Really Matter?
It does more than you might think. Although foam is mostly hidden, small areas may show, especially along edges or perforations. Choosing a foam colour that closely matches your thread helps hide any visible foam.
If you can see any foam after stitching, it can be gently tidied using our 3D Foam Perfecter tool for a neat and polished result.